We were well on with the brickwork now, mostly up to first floor level, double lintels over all brickwork openings where there was a curved header, conventional cavity lintels elsewhere, block work also up to first floor level, it was time to start thinking about installing the block and beam on the first floor. We had plumped for b&b on the first floor for reasons I outlined in a previous post and Hanson Building Products had designed this floor for us, however it involved some steel work
There were several pieces of steel, all of which had to be supported on pads of three courses of engineering bricks. The steel was designed-in, in order to keep the concrete beams short. The alternative was beams in the order of 7metres long which would have had a considerable upward curve in them causing problems later. The beams in most instances sit on the lip of the steel rather than on the top, this lip is at maximum 75mm wide. It was quite disconcerting to think that there was all that weight, blocks and beams sitting on that narrow a piece of steel, but as Hanson's said it was fine, who am I to question it. Anyway they have been sitting there for the best part of five years now without any problems!

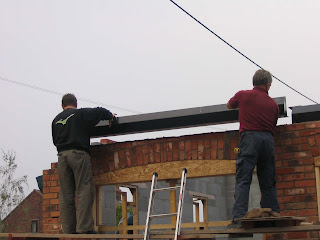
The family gets involved with the installation of the steels over the ceiling. The nearer one is a conventional I joist which supports the outer skin of the wall and the other is a C joist which supports the floor beams and the inner skin.

Steel joists which span the living room. The beams rest on three courses of engineering bricks at either end and consist of two C section joists back to back. The beams sit in the C.
I was also a bit concerned about concrete beams sitting directly on top of an aircrete block wall so I layed a course of bricks along the top to act as a pad for them. I love extra work!!
 |
| Crane hire to help move beams |
 | |||||
| Beams swing into place |
Once the beams were in it was a simple slog to install all the blocks to make the first floor. A dry mix of sharp sand and cement was then brushed into the voids to firm them up.
 As my wife is the resident photographer she would often not get in the picture, so here she is moving every one of the floor blocks onto the Bumpa.
And here's me taking them off at the top to fit them.

The Bumpa was a very useful tool and kindly loaned by a local builder.
Not everybody would choose to use block and beam for the first floor of a house but being old in the tooth and preferring a solid feel to its construction we decided to do so, however it is not without its drawbacks. The most significant of these is that there is no cavity between floors in which to run cables and pipes and together with using solid walls up and down location of services presented some issues. It is normal to lay a screed on the blocks but without constructing channels in the screed again there would be no place to put the services. In the event we were to construct a mesh of 50mm square timber both under and on top of the floor, one to support plasterboard and which would provide a cavity for cables and another on top also incorporating a cavity for pipework and to which we fixed the flooring.(more pictures of this later) Perhaps not the most elegant of solutions and one that most builders would avoid but it has given us a solid floor and no creaking.
It was at this point that another decision was made which was to lead to a rather large hole in our pockets but hopefully increased the value of the house substantially.
The original planning permission was for a four bedroom house over two floors but we thought why not make use of the loft space and increase it to five bedrooms and an extra bathroom. Wow! just like that. Actually it wasn't too difficult, by extending the b&b floor area over the hallway, incorporating a second set of stairs, roof lights and loft trusses it seemed to be achievable, so we duly submitted our proposal to the authority and to our surprise they agreed with the proviso that all occupied rooms had fire doors to the stairs. It was also necessary to include fireproof plasterboard to the underside of the floor, and so that's what we did!!
 |
| Block Work first floor(must be the tidiest site ever) |
 |
| Almost up to wall plate |
The floor was in and we now carried on with the block work up the the bearing plate for the roof trusses, this was easy as it could be done from the inside standing on the b&b floor, however to complete the brick work up to the same level it was time for scaffolding.
Well we like so many self builders were in a quandary about scaffolding. What was the best solution, buy the normal stuff and sell it later,(horrendous cost) hire it and complete the build in a limited time frame,(not for us as we could not meet the timescales)or buy it from the guy from Grimsby (I forget the name)who buys it back from you at a reduced cost. Then along comes our local friendly scaffolder who offers to hire it to us for a fixed charge and unlimited timescales, (I think he took pity on us) and we were off again, lucky devils?


Scaffolding in place and we can carry on up to the wall plate with the brick work. Note the scaffold hoist, bought for £800 and sold on eBay for £500, probably the most useful tool we bought throughout the whole build and absolutely invaluable.
The brick work is now up to roof level and before we can continue to the top of the gable ends and the chimney the roof timbers need to go on.
In my next post I will show you how we put the roof on and describe some of the construction involved.
If you have any questions about my blog or self build in general please email me. You can find my email address in my profile (top right of page). You can also become a follower of my blog by pressing the follower button or click on 'Comments' below to leave a message.
Thanks for viewing.


